Toll Free: 1 (877) 714-0415 | Local: (717) 436-8883

Simple RV Organization Hacks & Products

Proper RV organization is essential to RV life. There’s often little room to store things in your RV, despite clever in-the-stairs and under-the-bed storage spaces added in by most RV manufacturers. Other than these sneaky storage spaces, it’s hard to find ways to efficiently clean and store items in your RV. To help with RV organization, we gathered some of the best organization ideas and supplies to keep your RV clean and decluttered.

Before You Start RV Organization

Throw Out Items

The first thing you need to do is probably the most difficult. It’s time to Marie Kondo your RV by deciding which items spark joy and which ones need to go. Organizing will be impossible if your RV is cluttered with supplies and equipment you don’t need or don’t use.

Aside from throwing out random items, you should also throw out multiples you don’t need. Even if you have a family of six, you really don’t need all twelve plates in your RV. Stick to exactly what you need. Maybe one or two extras if you’ve got little ones risking breaking or losing things!

Everything Has a Place

The next step is designating a place for everything in your RV. This includes keys, loose change, random pens and all those little items in between. RV organization means no random junk drawers or things piled up on the countertops! Before you start organizing, place everything in the general area that will become its “home” once organization is done.

Develop a Cleaning Schedule

RV organization isn’t easy to keep up with. Once you have everything where it belongs, the real challenge will be making sure it stays there. Over the course of a few days or weeks your RV countertops will be full of random papers, change, chargers and other items. Before you know it, the clutter is back.

One of the best ways to combat clutter returning to your RV is by setting a cleanup schedule. It’s easier, and more realistic, than thinking you’ll clean every day. Designate certain days to tackle different rooms in your RV, or set aside one day a week to do a top-to-bottom cleaning. Cleaning and organizing routinely helps prevent an overwhelming mess forming and keeps RV organization more manageable

RV Organization Items

We’ll go over some of the best products on the market for keeping your RV organized. Whether they’re made with dorm-life in mind or they’re being used in ways other than the intended purpose, there are hundreds of products to help you organize your home or RV. From dollar store products to pricier items that make your life easier, here are some great RV organization ideas and items.

Storage Bins

Storage bins are a great way to organize everything you own. You can use bins to organize items in all the different hidden compartments in your RV. Place them under the couch, under the stairs or in RV shelves. Small or large, these bins allow you to organize items into easily-digestible categories and help you find what you need faster.

Dish Cradles

Dish cradles are another popular option for RV organization. These simple plastic containers allow you to store dishes vertically, meaning there is more space in the cabinet. They also make it easy to take dishes out of the cabinet without removing anything you may have stored on top.

Hanging Baskets and Peg Boards

Maximizing vertical space is absolutely essential in an RV. This can be easily accomplished in your RV kitchen, or in other rooms, by installing hanging baskets, hammocks or peg boards. Both provide ways to organize items on top of one another and out of the way. Say hello to the magic of maximizing vertical space!

Hanging Shoe Organizers

If you have a closet or door in your RV, there’s an opportunity to install a hanging shoe organizer. Depending on the size you get, you can store all kinds of items in shoe organizers. Use them to store towels, soaps, and even shoes! This is a popular organizing hack for dorm rooms or small apartments, and they work great in RVs as well.
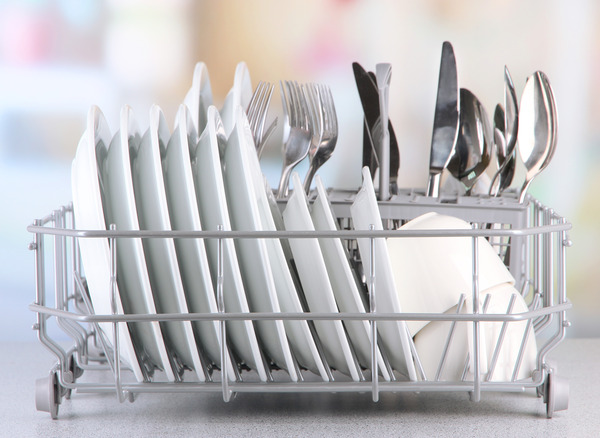
Dishes organized vertically an RV.

Photo Courtesy of The Getaway Couple

Velcro Storage

Although most popular for remote controls, there are plenty of things you can store using Velcro. Purchase Velcro squares on Amazon and use them to store things on walls and other out-of-the-way areas. Simply attach one piece to the wall and another to the remote, or another lightweight item, and you’ll always know where it is! Use it then stick it back on the wall so it’s available for the next time you need it.

Magazine Racks

These are great for storing items that are larger or can’t hang on a hook. Attach magazine holders, or narrow storage bins, to the side of your cabinets and other small spaces in your RV.

Happy friends with drinks and food near motorhome. Camping season

These products are just a start to RV organization ideas. There are hundreds of creative ways to store items and maximize space in your RV. Have a creative storage solution that isn’t on this list? Let us know! Tag us on Facebook when you share your RV organization hack so we can share all the clever ways RVers have found to declutter their homes.

Now that we’ve covered some of the best RV organization hacks and supplies, we hope your RV is spick and span and ready to go this season. If you’re in need of a remodel or upgrade to match your newly organized RV, Juniata Valley RV can help. Contact us to schedule your inspection or upgrade appointment at our certified service department!

Searching for a new RV?

Shop towable RVs, from fifth wheels to tiny campers, and motorhomes at Juniata Valley RV. Our award-winning Pennsylvania RV dealership is stocked with the best new and used RVs on the market. Browse our full inventory online and contact us when you’re ready to tour or buy!

The Basics: RV Winterization at Home

How to Winterize Your RV at Home

Before you park your RV in winter storage, be sure to prep it with proper RV winterization. Prevent any damage in the freezing temperatures over the next few months, and protect it from cold critters looking for a warm place to hide. RV winterization will ensure that when the snow melts and the sun stays past 5 p.m. there won’t be any damages or furry surprises waiting for you.

What You Need to Winterize Your RV

There are a few basic tools and materials you need to winterize your RV. Luckily, we have most of these available in our parts store! You can stop by Juniata Valley RV to browse our parts store. If we don’t have what you need in stock, we can order it for you! Browse our full parts catalog online and let us know if you’d like to place an order.

Hammer, pliers and other tools for RV winterization.
  • RV Antifreeze – Three to four gallons should be more than enough. But the amount you’ll actually use depends on the layout and length of your plumbing lines.
  • Water Heater Bypass Kit – If your RV isn’t already equipped with one.
  • Siphoning Kit – If the pump is not already equipped.
  • Cleaning Wand – To scrub your holding tanks until they’re squaky clean!
  • Basic Hand Tools – Some tools you’ll probably need include: power drill, crescent wrenches, needle nose pliers and a screwdriver. You also may need a flashlight!
  • Anode Rod – A plastic plug might also work.
  • Moth Balls & Mouse Traps – They’ll keep critters and creepy crawlies under control over the winter. Who can blame them for wanting a warm place to sleep?

Winterize Your RV Water Systems

Flush the Water Tanks

The first thing you’ll need to do to winterize your RV is drain and flush the black and gray water tanks. You never want to leave wastewater in your water tanks over the winter. They’re a breeding ground for bacteria, and freezing water can damage tanks and pipes over the winter. Once they’re emptied of water, we recommend using a black tank cleaner to ensure your black tank is completely cleaned out and ready for winter storage.

Flush the Water Heater

All the water needs to be emptied for proper RV winterization. This includes your water heater! Start by turning off the water heater and allowing it some time to cool down. Then, hook your RV up to city water. Use a wrench to remove the anode rod and open the pressure relief valve so the water can drain out. After it’s drained, flush the heater out for a few minutes until any sediment has been removed. Leave the anode rod out during the winter, but be sure to replace it in the spring.

Bypass the Water Heater

Make sure to bypass the water heater before adding antifreeze to your RV. You want to make sure there’s no chance of antifreeze making it into your water heater. Some RVs will have a bypass already installed. If not, you can start the bypass by removing the water heater service door. Then, remove the access panel to get to the valves inside. Adjust these valves to manually bypass the water heater.

Winterize Your RV Exterior

Prep the Water Pump

Locate the water pump and attach the siphoning kit. Then, place the siphoning hose in the antifreeze. Open the valve and turn on the water pump to allow the antifreeze to flow through the water system.

A line of motorhomes parked in the snow.

Open All External Faucets and Valves

You want to drain all the water from your RV before the freezing temperatures set in. Start by opening the lowest valve and work your way up, allowing the water to run out. Do this until you see the water change color, notifying you that the antifreeze has made it all the way through. Then, close and tighten the valve. Make sure to do the same with any external showers and faucets.

Winterize Your RV Interior

Flush Internal Faucets

RV winterization needs to be completed inside and out. Once you have put antifreeze in the water pump, open all interior faucets, showers and toilets. Let them run until the water changes color, signaling that the antifreeze has made it all the way through. Once you see antifreeze, you’re good to turn off the water for the winter.

Two RVs in storage. In need of RV winterization.

Pour Antifreeze Down the Drains

Pour antifreeze down any interior drains to ensure they’re prepared to withstand freezing winter temperatures. Pour antifreeze down sink drains, shower drains and toilets.

Remove All Items from the Interior

The last step of RV winterization, at least the last step we’re covering today, is emptying the interior of any items that won’t last the winter. Remove all food, clothes and other important items from your RV before leaving it for the winter. Leave your refrigerator, cabinets and any other doors open to keep air flowing and preventing mold or smells from building up over the next few months.

Once you’ve taken these steps, the RV winterization basics are done! You’re ready to place your RV in its winter storage spot and rest easy for the holiday season. You know your RV is ready and waiting for another fun-filled camping season when the snow finally melts again.

If you’re interested in hiring an expert team to perform RV winterization for you, look no further than Juniata Valley RV! Our service team has winterized hundreds of RVs, and we’re happy to add yours to the list.

Need RV winterization service?

Let our RV service technicians handle the heavy lifting when it comes time to winterize your RV! Contact our service department to schedule your RV winterization today.

Subscribe To Our Newsletter

Subscribe To Our Newsletter

Join our mailing list to receive the latest news and updates from our team. You'll get camping tips, featured units, special events, and more...

You have Successfully Subscribed!